
Posted by Metro Screenworks on Mar 30th 2022
How To: Install a Retractable Screen Door
How To: Install a Retractable Screen Door
Welcome to the Metro Screenworks blog! One of the most innovative products we offer are retractable screens. We have partnered with Genius to provide the best retractable options on the market.
Retractable screen doors are an excellent alternative to a traditional sliding screen door because they:
- Do not require track – for a more sleek look.
- Can be installed in openings where sliding screen doors can not.
- Protects the screen when its not in use (it hides out-of-sight) in the protective cassette.
Retractable screen doors can be installed in place of sliding screen doors but can also be used as front door retractable screens, retractable screen doors for French doors, and more. We offer custom retractable screens as well as an economy option that can be adjusted to fit most standard door openings. Check out all the available options on our website, or stay right here to learn how to install a retractable screen door.
How to Install a Retractable Screen Door In 12 Easy Steps
 Installing your first retractable screen may feel a little intimidating, especially if you’re new to DIY projects but in today’s blog post we will provide a step-by-step guide to installing your new screen door. Also,
instructions come with every purchase and the screen experts at Metro Screenworks are just a phone call away if you need some assistance.
Installing your first retractable screen may feel a little intimidating, especially if you’re new to DIY projects but in today’s blog post we will provide a step-by-step guide to installing your new screen door. Also,
instructions come with every purchase and the screen experts at Metro Screenworks are just a phone call away if you need some assistance.
With today’s post, we will be focusing on installing the Milano 100 a custom retractable screen door. If you bought a COOL screen door, it installs a little differently. You can find an instructional video for installation here.
Preparation: Make Sure You Have All the Parts & Tools Needed
Before you get started, you will need to make sure you have all the needed tools. Tools needed may include:
- Phillips screwdriver
- Measuring tape
- Hand-held or power saw
- Power drill & drill bits
- Needle nose pliers
- 2 Phillips panhead screws
The type of tools you need may differ depending on the type of door that you buy. This is the tool list for installing the Milano 100.
You will also want to make sure you received all the parts needed to install your new screen door. To determine if you received all the necessary parts, refer to the instructions that came with your order. If there is a problem with your order, contact us right away and we will help you.
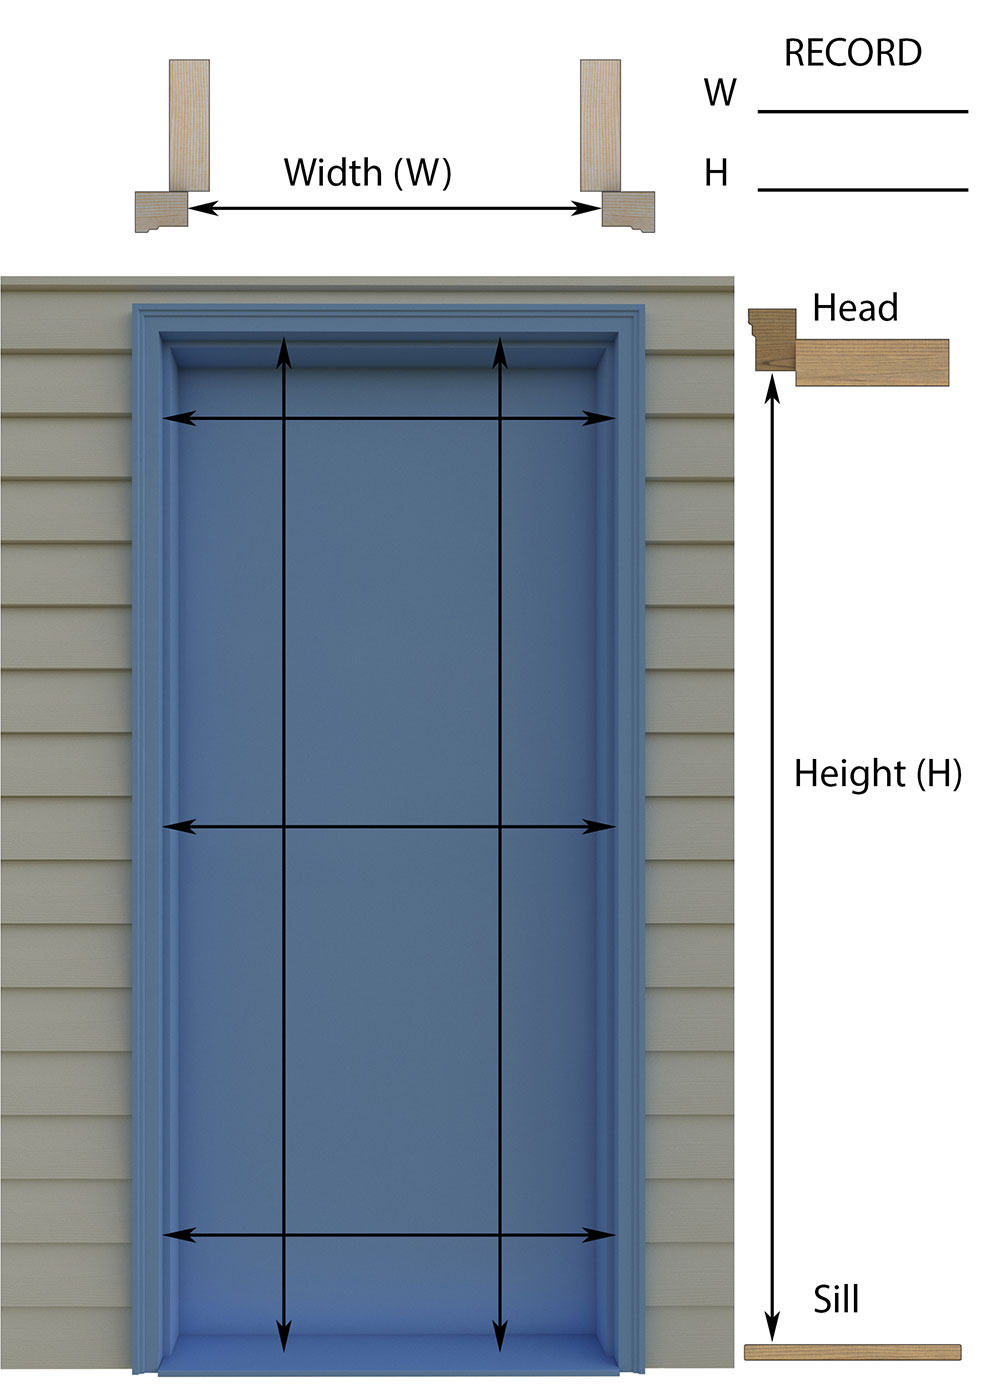
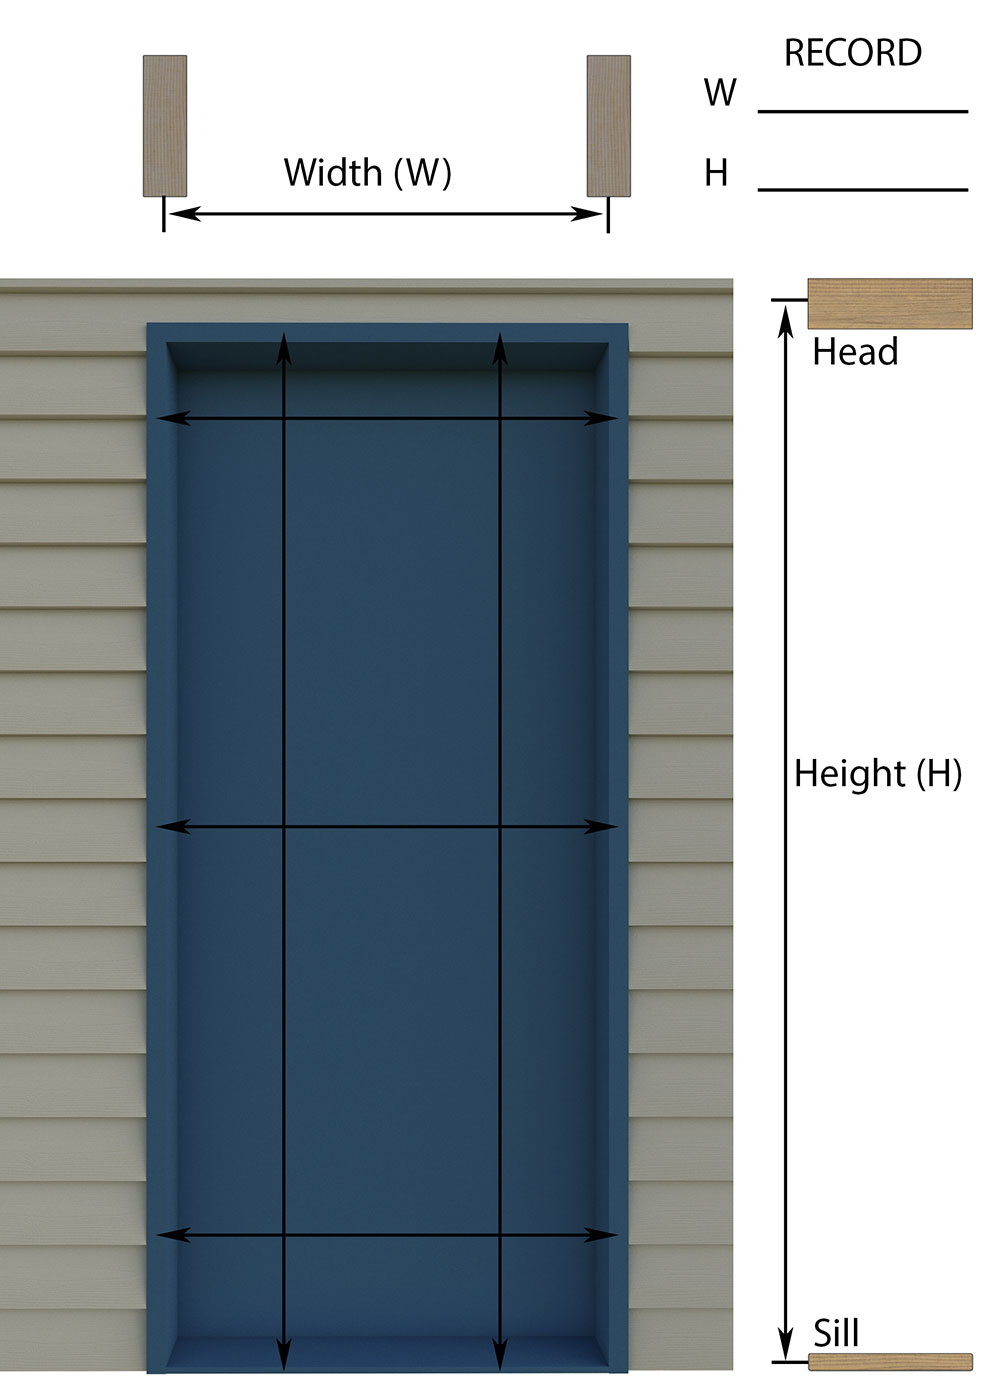
Step 1: Measure the Door Opening
Though you already measured your door opening before ordering your new screen door, we suggest double checking your measurements before installation. Measure the opening of your door in several places within the inside of the frame and record the smallest measurement. You can also surface mount the door if desired:
We also suggest subtracting 1/16” from net screen opening if you are using a transition.
Step 2: Determine the Sill Type
*This is the installation video for the COOL retractable screen – follow the steps below for installing a Milano 100.
Next, determine if you will need to install an extra board on the door sill: if your door sill stops short of the door trim, you will need to install a filler board. Measure, cut, sand and paint, and then install the board to fit under the sill and evenly with the outside trim.
Step 3: Determine Which Way To Install
*This is the installation video for the COOL retractable screen – follow the steps below for installing a Milano 100.
You will want to note which way your door swings to install your new screen on the correct side. Does the door swing inside your home or outside?
- If it swings in: mount the retractable screen door on the outside of your door frame.
- If it swings out: mount on the inside of the frame.
Step 1: Attach Boot Body
The Boot Body is the piece that will attach to the Cassette that houses the screen. First, you will want to install the Boot Body End Cap onto the Boot Body with the provided screws. Then, slide the Boot Body onto the top end of the screen cassette.
Step 2: Install Top Retainer Guide
Next, slide the Top Retainer on top of the Pull Bar’s interior side. You will adjust this later.
Step 3: Install Recess Mount Clips
You will want to install one Recess Mount Clip 16 inches from the top of the door frame, and another 16 inches from the bottom. We suggest using Phillips panhead screws here.
Step 4: Lock the Screen Cassette Onto Clips
Once you have the Mounting Clips secured, lock the screen Cassette onto the Mounting Clips.
Step 5: Trim the Top & Bottom Guide Rails
You will want to make sure the Top and Bottom Guide Rails are the right length before you install them. Using a saw, cut them to size. Once the rails are the right length, you can install the optional End Cap for the Top Rail. You may also want to crimp the ends of the other side of the Rail with pliers to keep the weather-stripping in place.
Step 6: Slide the Bottom of the Rail Into Place
Now that the Bottom Rail is ready for installation, slide it onto the Tab on the Cassette End Cap.
Step 7: Adjust Boot Body & Install Top Guide Rail
Once the bottom rail is in place, it’s time to slide the Boot Body upwards until it rests snuggly against the top of the door frame. Once that is secure, install the Top Guide Rail onto the Tab of the Boot Body.
Step 8: Install Side Rail
Now, it’s time to install the Side Rail. To do so, slide it at an angle behind and over the Bottom Guide Rail – the Bottom Rail should be inside the Side Rail. Then put the Side Rail inside the Top Guide Rail, against the vertical jam.
Step 9: Install Threshold Transition (Optional)
You will have to cut the Threshold Transition to size – refer to the printed instructions that came with your order. The Threshold Transition can help to eliminate tripping and will give your screen door a finished look. You will need to place the Transition End Caps on each end and then slide the lip of the Transition under the bottom of the Guide Rail.
Keep in mind, we offer Sloped Sill Wedge Shims to help level the door frame’s mounting surface if it has an angled door sill. Specify with your order or contact us.
Step 10: Use the Pile Opener to Install Screws
Next, you will need to install screws on the top and bottom of your door. Before you do, use the Pile Opener which will have come with your order to avoid ruining the pile that will help seal your screen door against insects. You will also need to install three screws on the Side Rail to secure the screen door frame.
Step 11: Adjust Top Retainer
Finally, you will want to adjust the Top Retainer Guide leaving a small gap. Tighten all the Allen head screws in the retainer
Step 12: Tighten Screws in Handles
You will need to use the Allen wrench to then tighten the screws in the front and back Screen Door Handle.
Try It Out & Enjoy Insect-Free Living!
Once you’ve finished tightening the screws in the handles, your retractable screen door is ready to use! Your Genius screen door will provide you with easy-to-use insect protection as the door can be operated with a single finger and glides smoothly in and out of the cassette.
For questions about your retractable screen door, contact the screen experts at Metro Screenworks. If you haven’t purchased your new screen door yet, learn more here. You can also visit the Metro Screenworks showroom in Highlands Ranch, Colorado to see how retractable screens work before you buy. We offer payment plans through Affirm to make your home improvement projects work for you! See details at checkout.